|
SpeedTick and SpeedTickLevel
We all know that there are big players in the markets that can move the markets at their whim. Simply by placing a larger number of trades very quickly, they can cause markets to move in their favor so they can take advantage of how the markets react to the sudden big moves. For traders that have some inside information about when this is happening, they have an exploitable edge by knowing what is likely to happen next. These market manipulations, as well as the immediate reaction to the manipulations, happen regularly on liquid instruments. You simply need to know what to look for.
SpeedTick will pick up when it is likely that orders processing through the markets are processing so quickly, it is unlikely retail traders (you and me) are able to trade that fast. Due to the market makers’ ability to place a group of large orders, their access to todays fastest computer technology, and placing these computers inside or next to the exchanges, you can easily see why they have an advantage over those of us that trade small lots via a laptop computer on a wireless network from our homes.
Knowing when this is happening is key to knowing whats about to happen next. And to be profitable as a trader, that's all you need to know.
Setting up SpeedTick
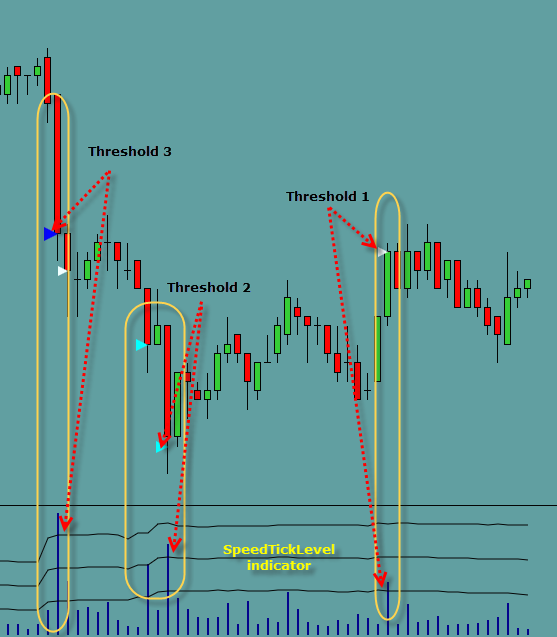
The signals that generate a SpeedTick are being generated from data supplied by an indicator called SpeedTickLevel (see below for more information). SpeedTickLevel is reading the rate of ticks (trades) coming into the market somewhat like a speedometer reads the rate of speed of travel. If the rate of ticks coming into the current bar are such that it is unlikely retail traders can trade that fast, then a SpeedTick will print on the current bar. Location of the SpeedTick on the bar has no bearing of its value.
To visually see where these thresholds are, the user can also load the IT_SpeedTickLevel histogram on the chart. To accurately see which bars on the histogram actually generate a SpeedTick on the chart, please make sure the settings in the SpeedTick and SpeedTickLevel are the same.-
TickValue is used to determine what size tick chart to use to measure the rate at which ticks are coming into the market. Its best to keep this somewhat low, but the lower it is, the slower the chart might load. If you notice that a very liquid market such as the ES chart is taking a long time to load, try increasing this number.
Period is the amount of time (in seconds) that the rate of ticks coming in to the markets is extrapolated over. Similar to saying miles per hour, we're saying ticks at this rate per 15 seconds (using 15 as the period parameter).
Signal Mode determines which version of the SpeedTick the user would like to use.
Legacy mode
will revert SpeedTick to being similar to how
the indicator was used for NinjaTrader 7. Because this indicator
has been used successfully for many years by many traders, the
assumption is that some traders may not want to change the
functionality of the SpeedTick moving forward into NinjaTrader
8.
Adaptive mode is the new and improved SpeedTick that allows the user to put the indicator on any chart for any instrument with little to no adjustment of the parameters necessary to get a good indication when the markets are possibly being manipulated. The indicator not only adapts to any chart or instrument, but also time of day and volume/speed of trades coming in relative to previous bars.
Please note below what some parameter settings do for each Signal Mode. (*printed in italics)
Thresholds
Thresholds help to determine when ticks (trades processed) speeds have exceeded what is likely possible for retail trader only trades.
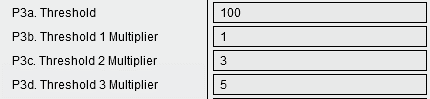
P3a. Threshold is the base line that measures the rate of ticks over a period to determine what would be most common trading speed. This period does not give us a SpeedTick signal, but gives us a baseline on each bar of the SpeedTickLevel from which to apply a multiplier to begin looking for market manipulator trades. *In Legacy Signal Mode, this would be the fixed Threshold level from which to begin generating SpeedTicks.
P3b. Threshold 1 is the first level from which a SpeedTick will be generated. In the example above, the multiplier is set to 1, so it would be 1x the threshold set in the P3a parameter setting (or the same number as the threshold set in P3a). The chart signal parameters for this threshold can be set in the plots parameter settings seen below. *Legacy Signal Mode: This is the main Threshold setting in past versions of SpeedTick. If you want to run this exactly as the NinjaTrader 7 version, set this to 1.
*Legacy Signal Mode: This is the Threshold 2 setting in past versions of SpeedTick. If you want to run this exactly as the NinjaTrader 7 version, set this to 2.
P3d. Threshold 3 is the third level from which a SpeedTick will be generated. In the example above, the multiplier is set to 5, so it would be 5x the distance from the threshold set in the P3a parameter. The chart signal parameters for this threshold can be set in the plots parameter. *Legacy Signal Mode: This is the Threshold 3 setting in past versions of SpeedTick. If you want to run this exactly as the NinjaTrader 7 version, set this to 3.
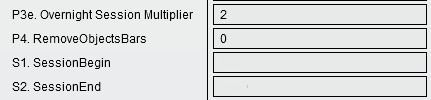
P3e. The Overnight Session Multiplier allows the user to tune out some of the many speedticks that might be generated during very low volatility time periods of a 24-hour day. As the Speedtick measures relative trade flow, it’s possible that a very slow period (i.e. only 1 or 2 trades during the life of the bar) followed by just a few more trades being processed through the exchange could generate a SpeedTick signal. This could happen on many bars and fill up the users charts with irrelevant SpeedTicks. The multiplier is applied to the P3a Threshold to essentially move the threshold far enough away from these low volume bars so that irrelevant signals are dramatically reduced or removed.
S1 and S2 Define regular trading session begin time and end time (military time). The P3 threshold settings will be applied to this range. Leave blank to use the P3 settings without using the Overnight Session Multiplier.
P4 RemoveObjectsBars is the number of bars to keep the SpeedTick signals on the chart. Set this to 0 to leave the signals on the chart without removing them.
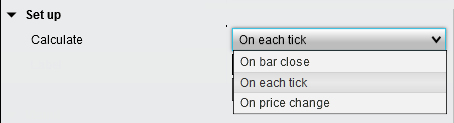
Calculate determines how often the indicator is recalculated on each bar. On Bar Close means once at the close of the bar. On Each Tick means on every single tick. On Price Change means once for each price change. If there were two ticks in a row with the same price, the second tick would not trigger OnBarUpdate(). This can improve performance if calculations are only needed when new values are possible. However, as we are more concerned with the rate of the incoming ticks rather than when price changes, "On Each Tick" is recommended.
Displacement
Due to the underlying data coming from a tick chart, a value of 1 is needed to produce a SpeedTick on the current bar. 1 is the recommended setting.
SpeedTickLevelHistorically the SpeedTickLevel indicator gave the user a tool to visually identify when trades are being filled very quickly. Users would use this tool to identify peaks in the histogram that corresponded with price suddenly changing direction immediately afterwards. This would be how someone would "tune" the SpeedTick parameter setting for each instrument and chart type on which they intended to use the SpeedTick indicator. Most traders would use this simply as a tool to identify SpeedTick threshold level settings and then remove it from the trading chart after applying the setting they found to the best to the SpeedTick indicator.
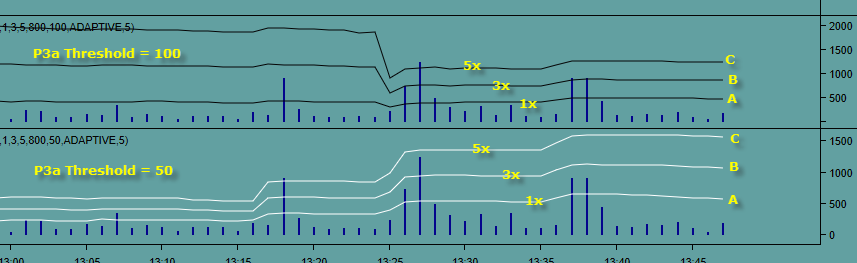
Threshold LInes
Using the settings in the parameters examples on the left, the upper histogram (Black lines) shows the P3b threshold line on the bottom (A). This line is also the P3a since its multiplier is 1x the P3 Threshold.
The next line up (B) is the P3c Threshold line. In the example, it is set to 3x the P3a Threshold.
The next line up (C) is the P3d Threshold line. In the example, it is set to 5x the P3a Threshold.
|